

When I was talking to my mom on the phone, I asked if she would be in the area of the Salvation Army anytime soon to snoop around for me. The next morning she SMS'd me:

I loved the lines and thought it would be perfect for the bedroom. My dad met me to pick it up, and my parents bought it for us as an anniversary gift! Heck yeah.
On to the details of "how to paint a dresser" and "how not to paint a dresser".... because apparently I learned how to do both.
- Sand it with fine-grit sand paper.
-Prime with oil-based primer. I primed the dresser with oil-based primer. This was not good for us because I had to paint this indoors (more on that in a separate post) and the fumes were so unbearable I had to change plans. So I sanded the oil-based primer off almost entirely.
- Prime with latex primer. I used a high-quality latex primer, applying it with a foam roller on the top, sides and drawer fronts. On the areas that the roller wouldn't reach, I used a paint brush. Note about this primer: To make sure it would adhere to the entire surface (even any spots of oil-based primer I couldn't remove) I used a primer that our local paint sore recommended. He said it was serious enough to be applied to ceramic tile and other difficult surfaces.
- Apply paint. I applied three coats of Benjamin Moore "Decorator's White", also using with a foam roller to large surfaces and a paint brush for the smaller areas.
- Seal with clear protective top coat, if you like. I used a paint brush for the entire piece (since rollers can cause bubbles) and applied two coats.
- Install new hardware, if ya' wanna'.
Here she is now!
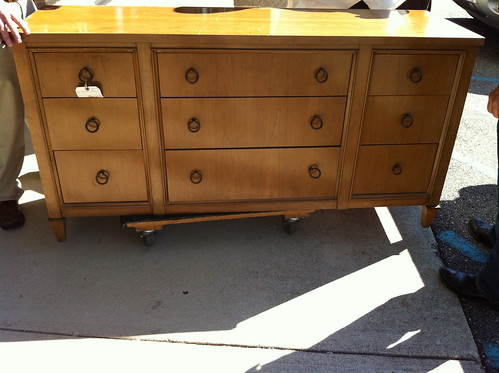 |
Dresser Before |
It had some pretty good scratches (deeper than they appear in the photo), but I used some wood filler and they're much better now!
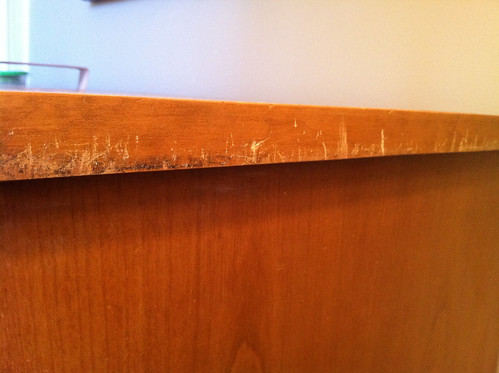 |
Scratches on the side |
 |
| After adding some wood filler |
On to the details of "how to paint a dresser" and "how not to paint a dresser".... because apparently I learned how to do both.
- Sand it with fine-grit sand paper.
-
- Prime with latex primer. I used a high-quality latex primer, applying it with a foam roller on the top, sides and drawer fronts. On the areas that the roller wouldn't reach, I used a paint brush. Note about this primer: To make sure it would adhere to the entire surface (even any spots of oil-based primer I couldn't remove) I used a primer that our local paint sore recommended. He said it was serious enough to be applied to ceramic tile and other difficult surfaces.
- Apply paint. I applied three coats of Benjamin Moore "Decorator's White", also using with a foam roller to large surfaces and a paint brush for the smaller areas.
- Seal with clear protective top coat, if you like. I used a paint brush for the entire piece (since rollers can cause bubbles) and applied two coats.
- Install new hardware, if ya' wanna'.
Here she is now!
 |
| New hardware |
 |
| White Dresser - After |
 |
| White Dresser - After |
What do you think? Was it worth all the TLC or should I have made the plunge for a brand new dresser?
Follow-up post coming soon with tips on painting furniture indoors.
You may also like:

Yes! It was totally worth it. WOW, that looks really great, in fact, it is pretty much exactly what I want for my own bedroom :)
ReplyDeleteThank you, Michelle! I'll keep my eyes peeled for you. :) I think it could have been friends with your Eladora:
ReplyDeletehttp://michellearmas.bigcartel.com/product/eladora
So beautiful! I just picked up two dressers from Craigslist and plan on doing the same color! I also love the hardware that came with my dresser but I want to spray paint it to give it an updated look. What spray did you use for your hardware?
ReplyDeleteHi there, Susan!
ReplyDeleteI actually bought new hardware for the dresser. I worried about the pulling hardware sustaining the "wear and tear" of use. (I've seen posts about repainting door knobs, but a year or so later they look pretty sad.)
Let me know if you need more details. :)
Hi Erin, I was just wondering about the sanding for the grooves and trim areas. It seems like it would be impossible to sand the grooves. Will the paint still adhere well?
ReplyDeleteThank you!
PS: Your dresser looks fabulous!
ReplyDeletemarc jacobs outlet
ReplyDeleteray ban glasses
mlb jerseys
ghd straighteners sale
pandora charms
michael kors outlet store
air max outlet
mlb jerseys
montblanc pens
michael kors uk
xushengda0505
kate spade handbags
ReplyDeletecheap mlb jerseys
birkenstock shoes
coach outlet store online
nike air max 2017
coach factory outlet
ugg boots outlet
sac longchamp
vans for sale
2017.6.12chenlixiang