Showing posts with label BeforeandAfter. Show all posts

Monday, June 17, 2013

The new house, before moving in (iPhone pics) - First Floor

We're due for sharing a photo tour of the new house! Beware: These were taken during very short viewings, during lunch breaks, etc. And while I was of course considering the blog, I hoped that I could make time for actual photos with a camera... but things moved more quickly than expected so camera photos are all we got. :) 

I've already shared a similar view of the entry/hallway...

Here's a view looking to the left, into the Dining Room. We really fell for the heavy pocket doors with window panes.

And here's a view from the other side. This room might be a little bit of a challenge. It's darker than I like, but generally a great space. Also the lighting isn't our style. But as we know, that can be fixed! 

The entry hallway leads into the living room, which is open to the kitchen. 

That's my awesome daddy on the left, pulling his phone out of his pocket I think (?)... Goofy shot but it's all I have. :) 

So here's the kitchen. Unfortunately the fridge didn't come with the deal, but the bones are good. And the tall custom cabinets with pretty classic lines are a great feature.

We also loved some details like the stained glass above the kitchen door. 


This leads into an area with the dining room straight ahead (that's the door with the window panes) and downstairs bath to the left. The pantry is on the right and the guest bedroom is that one with bright ligh on the right.

Here's the downstairs bath. It's a full bath, which makes sense for this house since our guest bedroom is downstairs. ButI do love the idea of decorating a powder bath! One day... :) 

Here's guest bedroom. This is a fairly cozy space but kind of a challenge with furniture placement. The room is long and the windows are kind of strangely positioned for a bedroom.  We shall rise to the challenge though, friends. And it will be fun! I've already made a good bit of progress on this room and can't wait to share.

Check back in for photos of the second floor!... :) I hope you all had a great weekend and Father's Day!

By the way, I love and treasure your email responses. If you don't mind though, leave a comment on Dwell and Tell.  :) Just plug in your name and e-dress. 

Is anyone else moving? Unpacking? Advice on getting settled in? :) 

Monday, July 2, 2012

Dining Room Chairs Repainted! Weekend Project

Remember this post about the chairs that needed some TLC (terrific-licious-carefromerin)? ...  That was dumb. Whatevs.

Chairs BEFORE
The dark chairs clearly didn't work with the new table, and the solution was obvious. They needed a paint job. We needed to "get our paint on". We needed to work. it. out. with our spray paint, ya'll. And with our place on the market to sell, it needed to be done real quick-like.

About the chairs, you guys. I liked the lines of the chairs (Roger Chairs from Ikea) which is one of the reasons I focused so hard on them. I knew these would look great painted any color. So I stalked them on Craigslist until I found them for $75. Hollah! Even if we did have to rent a car and drive a couple of hours to get them, it was a step in the right direction. And I knew they could work with various styles, should my tastes change down the road.

I've painted a few pieces of furniture (like this one and this one) and I love spray-paint, but I've never painted furniture with it before, only accessories. This is mostly because during the winter,  I can't use spray-paint outdoors (it won't cure properly if it's too cold outside). As you know, because we live in a condo we lack a climate-controlled option indoors, like a garage.

The second reason has to do with the color limitations. Typically the colors I'm wild about aren't available in ready-made, spray paint form.  But I remembered Centsational Girl's favorite white and settled on Rustoleum's Heirloom White for this project. I'm happy with the color! Especially considering if I had chosen another color and hand-painted this project, I would have spent a LOT more time on it.

First, for an overview of the process.  Here's a quick how-to:
Step 1: Clean your furniture well. Wipe it down to remove any obvious dirt.
Note: I didn't sand before priming. Many people do, some say it isn't necessary. The chairs have held up really well so far.
Step 2: Spray 2-3 thin coats of spray primer (I used Kilz spray-primer)
Step 3A:: Use a fine sandpaper to lightly sand in between coats. How do you know when you're done? I just rub over it with my hand to make sure the surface feels nice and smooth.
Step 3B: After you sand, wipe off the dust (I used a microfiber dust cloth)
Step 4: Spray about 2-3 thin coats of spray paint
Step 5 (for the jobs you want to last awhile: Seal with a protective finish like MinWax Polycrylic. - I omitted this step because this was a quick, temporary fix.

Prepping the project
You obviously need to spread out drop cloths to protect the surrounding area.  Since it was really windy outside, I used some 2x4's that I found behind our condo to keep the drop cloths from popping up and messing up the finish of the paint.
Ikea Roger Chairs - Before Painting

Priming 
Here's what it looked like after two coats of Kilz spray-primer, with light sanding in between for smoothe finish.  I could have made these coats even thinner.


And after a couple coats of spray paint... 

It's looking much better.

By the way, I've been meaning to take that lamp on the left down for weeks. After seeing this pic I FINALLY AND IMMEDIATELY took it down to our condo's basement. 


Again, I typically would have finished this project with a protective coating. But this is a quick fix, to get our place sold and remove this eye-sore for a temporary period.

Do tell, Dwellers! Any questions about painting furniture? Have you tried spray-painting recently? What do you think? How do you think it compares to painting it the old-fashioned way? Any temporary or "quick fix" projects you've approached recently?

Friday, January 27, 2012

Federal Style Buffet - Before & After

Remember awhile back when I mentioned a few projects that I've been working on? Here's one of several.

A very thoughtful aunt of mine called my parents to tell them she had a buffet in her house that needed a new home, and I was free to do whatever I liked to it (paint it).

No kidding, I've been debating styles for awhile but pretty much settled on this one.  Didja' see Michelle Adams's (the editor of Lonny) buffet last year?


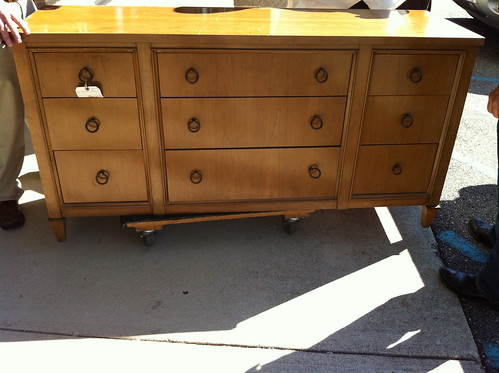
Enter federal-style buffet / sideboard.  Thank you, Aunt B!

Lovely bones. A little worn. But that's why we wear makeup, right gals?  That's all she needed...

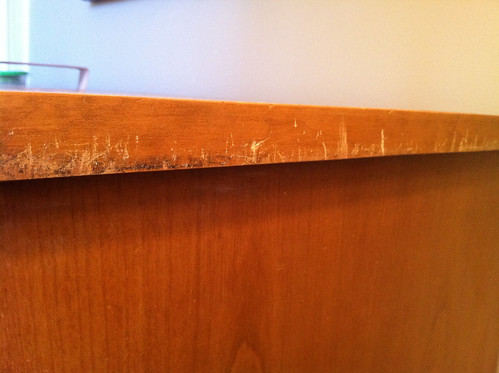
So that's what I gave 'er. :)  My sweet dad sanded the top of it for me where he noticed some deep scratches, and I appreciated this head-start for sure.  But don't get too jealous, because (like any DIY project) I inevitably ran into some obstacles.  Durn obstacles!
The first of which was this...  I kept getting distracted with all these adorable pets that were enjoying beautiful weather with me on the deck.  Case in point: Sammy. A.K.A. Sambo or "Crybaby Sam" (because she's always meow-ing about something, even if it's to say "hello").
By the way, don't mind her beat up ears and nose.  It's not because she's neglected. It's because she tries to attack the birds and they attack her back.  

Obstacle to conquering project #2: My wonderful mom with Scooter-man! (Funny story... Scooter recently went into the vet for a teeth cleaning and came out with his top front teeth gone. My mom had no idea until she was back home.)  It's not often that I get to spend one-on-one time with my Mama anymore so it was hard to focus on the project at hand.  
 
Obstacle #3: To make matters worse for my short attention span (but much better for my afternoon), my wonderful dad joined us for a few minutes. You remember this super-DIY-er from awhile back? I'm lucky daughter.)

But back to the buffet.  (See what I mean? I couldn't focus with all this family action.)  

I bought a spray painter for this job because I was working outside of our condo for once and was eager to see how it might speed things, but it was no good.  I really had my hopes up, but here's how my initial "test spray" ended:

(*Wop, Woooop*) So I primed and painted it the way I've done before, with some flocked rollers that are not as quick as a super-high-end sprayer, but are great for creating a beautiful finish.

I've tried a couple different kinds of rollers for furniture, but these are the best!  They're the same ones I used to refinish the dresser last year. The guy at the store where I purchased them, who mostly does work for decorators and contractors, said one of the contractors asked him to stop using them for samples because the customers were complaining about the finished product (without the special rollers) not looking as good as the samples (that my paint guy made with the flocked paint rollers)!  They look like this. (If you need to know the brand name, leave a comment and I'll try to get in touch with my guy at the store.  I tossed the wrapper.).


After sanding everything down with sandpaper, wiping it down, and priming it, the buffet looked  bit like this:

Now for the paint color.  Interesting reasoning for the choice here, I think.  I realized it was getting colder this fall and I had a very limited time frame to paint this buffet outdoors (on my parents' deck).  If I dilly-dallied around choosing a paint color, it could get really cold outside and the paint would be drying in not-so-ideal conditions.  So I decided to jump in, without thinking much about it, and use some paint I had on hand from painting our bedroom accent wall. 

Kind of a weird angle (for a reason... I was trying to hide the new dining room table... which we'll get to soon), but here it is.  Sanding, priming, two coats of painting and some polishin' later:

I have to admit: this is a really bad "after" shot/angle. I'm kinda' mad at myself. But you'll see why.  I'm saving another reveal (hint: it may or may not  be a successful project) that was in the way of getting a better shot.
So I want to know what you think.  Liking this makeover?  Do you love some DIY projects but find it super easy to get distracted like I do sometimes? Any painting or projects going with you? What do you think of the color?  


Tuesday, June 7, 2011

Bedroom - Before & After Painting

I've been slowly working on a bedroom re-do and have some progress to share!  This is good readin'., like your favorite trash tv show.  Lots of embarrassment.  Confusion.  Bad choices.  Shame... then redemption.
 
Let's begin with my very first wall color selection ever.  Remember, friends... ever.  So I went crazy... CRAZY town, crazy.  Take-your-top-off and twirl-it-in-the-air kinda' crazy.

BEFORE
It all started innocently enough. A pretty photo from Domino of an office designed by Mary McDonald. It had everything I thought I wanted: personality, modern touches, enough glam for a newlywed gal. It's really a great example, though, of something that didn't translate well into real-life (not mine, that is).

Mary McDonald, featured in Domino Mag, via decorpad
Drumroll, please....
I realized the result was a total joke, but it took some time to come up with another plan. This was about a year ago.  I really never thought these "before" camera shots would end up on the blogosphere.

What, ya want more?  Lucky for you.  We have more blue.
I just threw up in my mouth.

I remember waking up from a vacation last year, really groggy and still half-dreaming ("Am I still on vacation?" kind of state).  I took a glimpse at the wall color and thought "I don't like this place! Where the heck am I?  Get me out of here!"  That's when I realized I had to make a decision on a new paint color. STAT.

I finally decided to paint two gray wall colors...  A deep, dark shade for the wall behind the bed, and a lighter shade for the other walls.  Here's an image of paint swatches, just before we started painting.

Thank heavens my MIL came over and helped us paint.  She's lightning fast and literally loves painting walls, so we were really speedy.  In one weekend we painted the bedroom and the bathroom.  Not impressed?  You've done better?  Pshhheh, what-evs.

Next I added some curtains behind the bed. You can still see the shadows of the mini-blinds coming through, but I'm planning to replace them with some roman shades soon.  Next I bought some new bedding (a coverlet and a light comforter) to lighten things up.

AFTER
Here's where we were a few weeks ago, before adding the art I mentioned couple of weeks ago.


The paint colors we chose were Valspar's "Rugged Suede" and Benjamin Moore's "Coventry Gray".

This is actually a better representation of primary wall color.  It leans to the blue side, for sure.  More than we expected.  But I'm happy with it!  The new frames add some interest, but keep the color palette simple and sleek.

I'm not nearly done, but we've come a long way so far.

I can't say I "regret" the original color.  It was part of the process.  But goodness gracious I'm glad to have it gone.

Here's what I have planned for the next:
  • Hang curtains by the single window
  • Choose a bed.  Buy it.
  • Buy or make baskets for underneath the bedside tables
  • Paint the tray on the bedside table
  • Decide whether or not to paint the bedside tables
  • Find new lamps
  • Install roman shades
  • Decide what to do/hang on the left wall (opposite of the single window)
Like the change?  Ever chosen a horrendous paint color like I originally did?  Any paint projects planned?

Wednesday, June 1, 2011

Makeover for the Bloggidy-Blog

We're back from Jamaica. Do I look different?  Refreshed?  Sunny?  Nope. I was wearing SPF-85 on the face.  Plus a hat.  But now that you mentioned it, I did have some work done.

BEFORE
Dwell & Tell is growing up.  A design makeover.  Oh, yes.  I gave myself an early birthday gift.   

I actually set up a blog on December 26, 2009, ya' see.  But I didn't get started for over a year, because I couldn't create a design I was proud of.  This year I made a vow to get it started regardless, but knew I would be more excited about it when it looked more finished.

AFTER

These peeps are awesome.  Talented.  I chose the ampersand, color scheme, and background... and they made magic.  Despite my crazy questions, like "What about these colors?", "Do you like this font?", "Is there really a Santa Clause?", "Does this make my butt look fat?" and "Will you play with my hair?". 

Check 'em out in my sidebar, and let me know what you think.  A few more changes are on the way for the blog design.  Thanks to Erin (not me, Erin, blog designer Erin) especially!

Friday, April 8, 2011

Living Room Progress - Dresser for TV

Just a year or so ago, here's what our living room looked like.  I'm sure you'll agree it was time to replace the dorm-room-esque corner TV stand of the hubby's.

BEFORE - Wall with the television... and Bonnie.

After considering all the options, I decided to look for a mid-century dresser, instead of an entertainment unit or tv stand. Ya see, the tv dictates about 50% of our "living room" time, but I tried my best to think of how I would decorate it if it wasn't dictating the space.  Lots of ideas came to mind, then I windled them all down to the question "since we do have a tv what makes sense?".  A dresser seemed to be the best compromise between design, storage and technology.

And then I found a spectacular piece on the house of Craig.  It was great... wonderfully made, great lines, but just transitional enough to last through a number of years.  And six drawers!  Much more than the average TV stand. 

But it was $1,200.  While I appreciated the beauty and functionality I didn't want to spend all that jazz (I make up substitute words, by the way, so in case you aren't following jazz = dollahs) on one dresser.  I kept watching Craigslist for several weeks... maybe months.  It was posted again at $1,000 and I was still obsessed, but unwilling to make the plunge.  Then one fateful evening, after reading some random article about the fear of commitment and getting myself pumped, I made a phone call to see if the price was negotiable.

We went to see it.  It looked good.  And apparently the lady selling it had an antique store in NYC before moving to Greater-Birmingham. (She had LOTS of other stuff) and had purchased it for around $3,000 in New York years ago.

My hubby's a great negotiator when charged, and we came in at less than half of the original $1,200 asking price.

Here's the result:

AFTER / In progress - Living room wall.  Danish modern dresser for television.

Yep, something still needs to happen behind that wall (still thinkin' stripes) but it's an improvement, RIGHT?  Doesn't feel as much like a dorm room now, and really opens up the space (plus, storage to boot! Hallelujah!)

I'd love to hear what you think.  Experience with hard-balling your craigslist finds, working around electronics like the TV?

Monday, March 21, 2011

It's Up! - Chandelier in the Bathroom

If you've been following along, you may remember the tutorial on how to create an antique finish on a chandelier (or most anything else, for that matter). 

Here's a reminder of where we started:

A lonely light bulb.
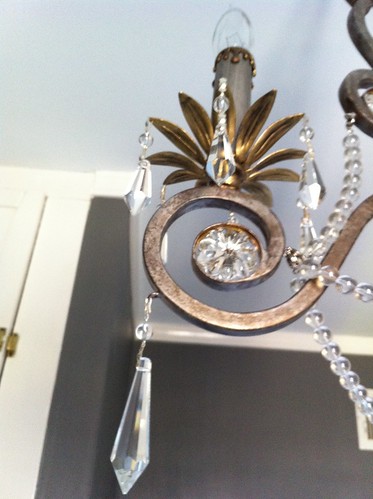
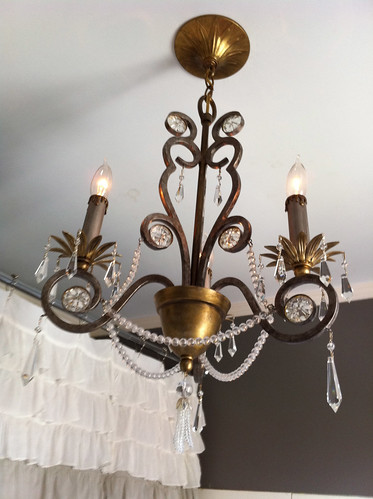
And what the chandy looked like before:


Of course, then we painted it and it was time to hang-er-up! (Shout-out to my dad for handling the installation... woot-woot!)

The only problems I ran into after hanging it were:
(1) That the tiny holes on the "flower petals" (you'll see those below) closed up with paint.  I spent some took some time on the ladder poking a safety pin through them.  Actually, I couldn't find safety pins at first and had to use my poor Humane Society name tag.  I'll need a replacement.
(2) That one of the hooks for the chandelier beads was missing (manufacturer defect).  Bummer because it was so close to being done!  So I ran to Hobby Lobby and found some little metal pieces in the jewelry section that were the perfect size.  I attached one with some glue and we were good to go!

Tiny metal piece glued to the chandelier.
Enough chit-chat.  It's time for the reveal.  


Some detail shots...

chandelier_after4_detail

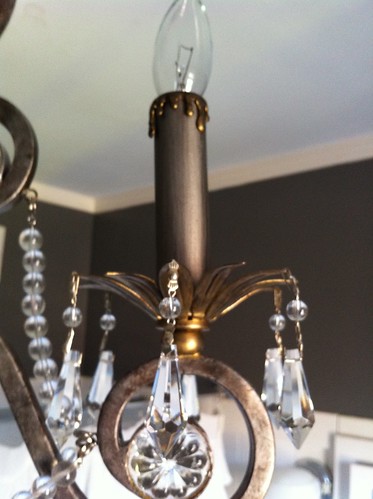
These little crystals remind me of a lamp my grandmother had in her house.  I always thought it was so "fancy" and regal.  So Seth's first impression was actually pretty appropriate: "It's fancy!"

chandelier_after5_detail

chandelier_after1

I really like the shadow it casts at night.  I totally planned that.  Okay no, that's a lie. But it's a neat surprise, right?


I think it's an improvement from the bare lightbulb... and for a mere $25 plus paint supplies!  What do you guys think?

You may also like:
How to Paint a Chandelier - Antique Finish
It's Done! - Ruffle Shower Curtain, Revised

Tuesday, March 15, 2011

Dresser Before and After

I recently found a great dresser at a thrift store in need of a little makeover. Here's a quick run-through of how it was tackled... setbacks and all.

When I was talking to my mom on the phone, I asked if she would be in the area of the Salvation Army anytime soon to snoop around for me.  The next morning she SMS'd me:


I loved the lines and thought it would be perfect for the bedroom. My dad met me to pick it up, and my parents bought it for us as an anniversary gift!  Heck yeah.


Dresser before
Dresser Before

It had some pretty good scratches (deeper than they appear in the photo), but I used some wood filler and they're much better now!


Dresser scratches
Scratches on the side

After adding some wood filler

On to the details of "how to paint a dresser" and "how not to paint a dresser".... because apparently I learned how to do both.

- Sand it with fine-grit sand paper.

- Prime with oil-based primer.  I primed the dresser with oil-based primer.  This was not good for us because I had to paint this indoors (more on that in a separate post) and the fumes were so unbearable I had to change plans.  So I sanded the oil-based primer off almost entirely.

- Prime with latex primer. I used a high-quality latex primer, applying it with a foam roller on the top, sides and drawer fronts.  On the areas that the roller wouldn't reach, I used a paint brush. Note about this primer: To make sure it would adhere to the entire surface (even any spots of oil-based primer I couldn't remove) I used a primer that our local paint sore recommended.  He said it was serious enough to be applied to ceramic tile and other difficult surfaces.

- Apply paint.  I applied three coats of Benjamin Moore "Decorator's White", also using with a foam roller to large surfaces and a paint brush for the smaller areas.

- Seal with clear protective top coat, if you like.  I used a paint brush for the entire piece (since rollers can cause bubbles) and applied two coats.

- Install new hardware, if ya' wanna'.  

Here she is now!


New hardware
White Dresser - After


White Dresser - After

What do you think?  Was it worth all the TLC or should I have made the plunge for a brand new dresser?

Follow-up post coming soon with tips on painting furniture indoors.

You may also like: