Showing posts with label diy. Show all posts

Monday, March 4, 2013

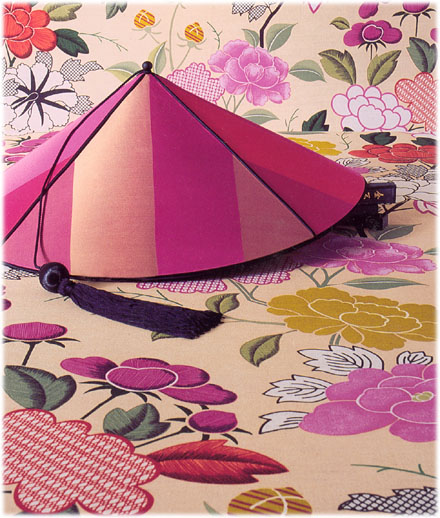
Fabric-adabra Crush! (Manuel Canovas Misia)

I've been fairly in love with a designer fabric for about a year...

Manuel Canovas Misia - via
In case you haven't seen it before, meet Misia, by Manuel Canovas.

 Here she is, used as the most adorable laundry room skirt.
home of Sarah Tarthill - via Design*Sponge
I first spotted it in the blog header of Bijou and Boheme... I emailed Christine (the writer) and she was very gracious to share the name of the fabric. She found a remnant on eBay if memory serves, and had it made into a pillow.
via Bijou and Boheme
But I couldn't find it anywhere! It's typically only available to the trade. BOO! And it's from overseas, making it more difficult to locate.

Here's another glimpse at the (pricey but beautiful) possibilities...

via Housetohome

 One last detail shot..
via fabrick.com
I finally found a source, and bought it online! The plan is to frame it as wall art. I love how well it plays with so many other colors, and is elegant but modern and vibrant all at the same time.

I will share the results soon.

Until then, I will Misia you. ;)

Thursday, October 18, 2012

How to Make a DIY Abtract Painting... By Monet-Erin. MonErin.

Do you remember when I mentioned the idea of trying some DIY abstract art for the bedroom? Now do you remember rolling on the floor and bellowing "Gooooohoohoood luck!  Bahahaha!". Well I don't totally blame you, Doing this kind of project can be sort of intimidating, I know. I speak-eth from experience. But I tried it out on a small canvas this weekend and want to share some tips I discovered with my step-by-step process, as it evolved.

Disclaimer: I do not consider myself an visual artist. I'm not even claiming this looks really great. But it's a starting point for those of us who may want to pick up a paintbrush and try something. I'm not pretending to know more than I do. So please, please do not keep calling me Picasso. It's embarrasing. Call me Monet-rin. MonErin. 

Step 1 (Optional): Find an inspiration painting. Don't feel like it has to be a replica! It doesn't. I chose this guy, as a practice for my bedroom painting:
from designer Leslie Strauss via decorpad
If anyone knows how I can credit the artist above, please let me know. 
Remember, only "based on' this painting. I like the color and composition, but replicating it exactly isn't nearly as much fun (and it's impossible). 

Step 2: Paint your canvas the background color of your choice. Mine was used for testing paint colors for the bedroom, so I just kept it as-is.

Step 3: Start layering with your primary "foreground" color.


Step 4 Add more pops of color, a little at a time.


How to Make a DIY Abstract Painting :)

 Step 6: Enjoy your work!


The biggest thing I learned was it's a lot more fun if you're not too critical of yourself. Have fun and enjoy it.

Have you tried DIY art of some king, painting or otherwise? Were you pleased with the outcome? Did you learn anything from the experience? Or would you rather just buy something?

Monday, July 2, 2012

Dining Room Chairs Repainted! Weekend Project

Remember this post about the chairs that needed some TLC (terrific-licious-carefromerin)? ...  That was dumb. Whatevs.

Chairs BEFORE
The dark chairs clearly didn't work with the new table, and the solution was obvious. They needed a paint job. We needed to "get our paint on". We needed to work. it. out. with our spray paint, ya'll. And with our place on the market to sell, it needed to be done real quick-like.

About the chairs, you guys. I liked the lines of the chairs (Roger Chairs from Ikea) which is one of the reasons I focused so hard on them. I knew these would look great painted any color. So I stalked them on Craigslist until I found them for $75. Hollah! Even if we did have to rent a car and drive a couple of hours to get them, it was a step in the right direction. And I knew they could work with various styles, should my tastes change down the road.

I've painted a few pieces of furniture (like this one and this one) and I love spray-paint, but I've never painted furniture with it before, only accessories. This is mostly because during the winter,  I can't use spray-paint outdoors (it won't cure properly if it's too cold outside). As you know, because we live in a condo we lack a climate-controlled option indoors, like a garage.

The second reason has to do with the color limitations. Typically the colors I'm wild about aren't available in ready-made, spray paint form.  But I remembered Centsational Girl's favorite white and settled on Rustoleum's Heirloom White for this project. I'm happy with the color! Especially considering if I had chosen another color and hand-painted this project, I would have spent a LOT more time on it.

First, for an overview of the process.  Here's a quick how-to:
Step 1: Clean your furniture well. Wipe it down to remove any obvious dirt.
Note: I didn't sand before priming. Many people do, some say it isn't necessary. The chairs have held up really well so far.
Step 2: Spray 2-3 thin coats of spray primer (I used Kilz spray-primer)
Step 3A:: Use a fine sandpaper to lightly sand in between coats. How do you know when you're done? I just rub over it with my hand to make sure the surface feels nice and smooth.
Step 3B: After you sand, wipe off the dust (I used a microfiber dust cloth)
Step 4: Spray about 2-3 thin coats of spray paint
Step 5 (for the jobs you want to last awhile: Seal with a protective finish like MinWax Polycrylic. - I omitted this step because this was a quick, temporary fix.

Prepping the project
You obviously need to spread out drop cloths to protect the surrounding area.  Since it was really windy outside, I used some 2x4's that I found behind our condo to keep the drop cloths from popping up and messing up the finish of the paint.
Ikea Roger Chairs - Before Painting

Priming 
Here's what it looked like after two coats of Kilz spray-primer, with light sanding in between for smoothe finish.  I could have made these coats even thinner.


And after a couple coats of spray paint... 

It's looking much better.

By the way, I've been meaning to take that lamp on the left down for weeks. After seeing this pic I FINALLY AND IMMEDIATELY took it down to our condo's basement. 


Again, I typically would have finished this project with a protective coating. But this is a quick fix, to get our place sold and remove this eye-sore for a temporary period.

Do tell, Dwellers! Any questions about painting furniture? Have you tried spray-painting recently? What do you think? How do you think it compares to painting it the old-fashioned way? Any temporary or "quick fix" projects you've approached recently?

Thursday, March 1, 2012

New (Questionable?) Farm Table Addition

In many ways, I loved our ikea dining room table (bought on Craigslist for $150 I think).  For example, how it expanded to seat up to ten people (although we never used it for more than four), but fit perfectly in it's un-expanded state. I loved the clean lines, the modern silhouette.  And the price.

Dining Room awhile back - including our previous table
(ikea's bjursta table in brown/black)
But two things were bothering me more and more: First, it was really dark.  The color was called "brown/black" but some people that came over thought it was black.  It just seemed so heavy against our light walls and dining room rug.
Leg of the table (pretty dark, see?)
Secondly, my eyes found it increasingly... ikea-ish... compared to some other things in our home.  Which is not to say I'm some worldy traveler and collector of goods from around the globe.  There are a number of items that have come frome ikea. I love them!  But my eyes kept getting hung up on the big-box-store, faux-wood finish.  For those of you out there considering this table (the ikea bjursta in brown/black): don't let me discourage you! For months I obsessed over how "perfect" it would be for our crib... It's just dark and stuff! Nuf said.  Moving on.

So when my mom mentioned that she was going to kick her own kitchen table to the curb, I took note. The style of her farm table has certainly come back en vogue and the timing seemed appropriate.  Not to mention the idea of having a table that had personal history (my fam enjoyed a number of meals together on this table in high school).

A little peek into my mind:
Farm table - Does anyone know the original credit for this image? 

I sold our ikea table for probably $10-$15 less than I purchased it for, kinda' semi-impulsively. I had movers scheduled to bring the buffet, remove some other items and bring in others for our guest bedroom/office (you know I'll update you on that) - so I decided to go ahead and get it all done in one fowl swoop.

There were a few imperfections here and there that needed to be remedied. I sanded the sucker. Dad led the charge (this was all happening on my parent's back deck).

And  take a look at this  was almost definitely result of one of us four kiddos (looks like my little brother, but who knows?):


 So here's what I used, in a addition to my dad's power sander (although that's not mandatory):
Materials for the farm table re-do: sandpaper, tung oil, and towels
Dad started to sand the outer edge with the power sander.

Then it got more complicated... Here's my dad demonstrating how to manually sand the rest of the wood (the rest of the job was up to me, boo-hoo).  Remember, you sand with the grain of the wood. Because this table had wood several panels that criss-crossed quite a bit, it meant  a bit of manual labor and patience.

After a lot more sanding, and ended up with this.
See the difference in the color on the top vs. the bottom?
Only the top was sanded at this point


Neeehhxt, we started working some Tung Oil on the wood with a cloth, to provide protection from moisture and give it a slightly richer finish.
Hubs felt like lending a hand this weekend! He's applying the Tung Oil.

After the tung oil dried and we moved the table in... here you go.
"New" farm table in the dining room. 
I'm still really split on this one.  It certainly has a warmer feel. But it seems to look a little too small.  Even though it's only an inch or so shorter and narrower than our last table, it looks even smaller.

The chairs will have to be re-painted or replaced (no surprise there, of course).   I can't decide.  What do you think?

Friday, January 27, 2012

Federal Style Buffet - Before & After

Remember awhile back when I mentioned a few projects that I've been working on? Here's one of several.

A very thoughtful aunt of mine called my parents to tell them she had a buffet in her house that needed a new home, and I was free to do whatever I liked to it (paint it).

No kidding, I've been debating styles for awhile but pretty much settled on this one.  Didja' see Michelle Adams's (the editor of Lonny) buffet last year?


Enter federal-style buffet / sideboard.  Thank you, Aunt B!

Lovely bones. A little worn. But that's why we wear makeup, right gals?  That's all she needed...

So that's what I gave 'er. :)  My sweet dad sanded the top of it for me where he noticed some deep scratches, and I appreciated this head-start for sure.  But don't get too jealous, because (like any DIY project) I inevitably ran into some obstacles.  Durn obstacles!

The first of which was this...  I kept getting distracted with all these adorable pets that were enjoying beautiful weather with me on the deck.  Case in point: Sammy. A.K.A. Sambo or "Crybaby Sam" (because she's always meow-ing about something, even if it's to say "hello").
By the way, don't mind her beat up ears and nose.  It's not because she's neglected. It's because she tries to attack the birds and they attack her back.  

Obstacle to conquering project #2: My wonderful mom with Scooter-man! (Funny story... Scooter recently went into the vet for a teeth cleaning and came out with his top front teeth gone. My mom had no idea until she was back home.)  It's not often that I get to spend one-on-one time with my Mama anymore so it was hard to focus on the project at hand.  
 
Obstacle #3: To make matters worse for my short attention span (but much better for my afternoon), my wonderful dad joined us for a few minutes. You remember this super-DIY-er from awhile back? I'm lucky daughter.)

But back to the buffet.  (See what I mean? I couldn't focus with all this family action.)  

I bought a spray painter for this job because I was working outside of our condo for once and was eager to see how it might speed things, but it was no good.  I really had my hopes up, but here's how my initial "test spray" ended:

(*Wop, Woooop*) So I primed and painted it the way I've done before, with some flocked rollers that are not as quick as a super-high-end sprayer, but are great for creating a beautiful finish.

I've tried a couple different kinds of rollers for furniture, but these are the best!  They're the same ones I used to refinish the dresser last year. The guy at the store where I purchased them, who mostly does work for decorators and contractors, said one of the contractors asked him to stop using them for samples because the customers were complaining about the finished product (without the special rollers) not looking as good as the samples (that my paint guy made with the flocked paint rollers)!  They look like this. (If you need to know the brand name, leave a comment and I'll try to get in touch with my guy at the store.  I tossed the wrapper.).


After sanding everything down with sandpaper, wiping it down, and priming it, the buffet looked  bit like this:

Now for the paint color.  Interesting reasoning for the choice here, I think.  I realized it was getting colder this fall and I had a very limited time frame to paint this buffet outdoors (on my parents' deck).  If I dilly-dallied around choosing a paint color, it could get really cold outside and the paint would be drying in not-so-ideal conditions.  So I decided to jump in, without thinking much about it, and use some paint I had on hand from painting our bedroom accent wall. 

Kind of a weird angle (for a reason... I was trying to hide the new dining room table... which we'll get to soon), but here it is.  Sanding, priming, two coats of painting and some polishin' later:

I have to admit: this is a really bad "after" shot/angle. I'm kinda' mad at myself. But you'll see why.  I'm saving another reveal (hint: it may or may not  be a successful project) that was in the way of getting a better shot.
So I want to know what you think.  Liking this makeover?  Do you love some DIY projects but find it super easy to get distracted like I do sometimes? Any painting or projects going with you? What do you think of the color?  


Thursday, July 21, 2011

Honey, You Mossed Try It! - (DIY Moss Letter)

I was just itching for an afternoon craft project a couple of weeks ago, after being tied up for several weekends in a row with out-of-town tasks and whatnot. After seeing a few tutorials online, I decided to get my fix by creating a moss-covered letter.  This was one of those "I don't know why I'm doing this but I want to" kind of projects.  I knew I would like it, even though I have no idea where it'll end up.  After all, I love the color and flair these can bring to walls, bookshelves, and various vignettes.

And after all, it's not like I'm investing in a moss-tang.  It was basically the price of a jar of moss-tard.  (Yep, I just went there.)

So...

Here's what you'll need:
- Letter (I used an inexpensive cardboard letter from JoAnn)
- Sheet moss (I used two packages, but would recommend buying three so you have more large, full sheets to work with)
- Low-temp glue gun (The "low-temp" part may reduce the amount of curse words and hopping around like a fool while shaking your frying hand in the air.  At least, that's what I was thinking.)
- Glue sticks
- Something to cover your floor/craft area (I used free Christmas wrapping paper I keep on hand for projects)
- Scissors

In case you didn't notice, I didn't include scissors in the photo above. On accident.  But I mean, you do have other options.  You could shred the moss with your teeth, for example.  But I would recommend it. (a) The moss will get stuck in your teeth (b) It's really messy (c) I don't imagine it tastes very good (d) If the neighbors catch a glance through the windows, it would be rather hard to explain.

So, use scissors - even if I didn't include them in the photo, mm-kay? Moving on...

Get to Workin':
It's pretty simple.
- You just fold the sheets out, then start wrapping pieces around the letters.
- Glue the pieces in place, one piece at a time.

Here's my progress after the first sheet.

Next:
- Use your scissor to trim around the excess around the edges.
- Keep gluing pieces next to each other.

As I mentioned earlier, I might buy more than two packages to make things move along more easily. My packages had about 1-1/2 larger sheets and a few smaller pieces for each package, so I had to spend more time making each "seam" look natural and fairly seemless.  I think would be easier to have three-or-so large sheets, and just use a couple smaller pieces to fill in. Capeesh?

Here's the final product:

And some detail shot of the side...

I got my crafty-fix.  And a moss letter in the process!  I keep moving it around our place.  It looks so vibrant in each little spot. 

Do you ever find yourself itchy to get your hands a-workin' to make something pretty?  Do you love the bright green moss as much as I do? Any recent crafty projects to share? 

Tuesday, May 3, 2011

DIY Wall Art for the Bedroom - Letters

A couple of weeks ago I went to Pier One to return something.  Naturally, I couldn't help but to take a gander at everything else while I was in. 

These pretty frames caught my eye.  I thought they might contrast nicely against the bedroom wall behind our bed.


I immediately started brainstorming what to put in the 4"x4" picture frame area.  I don't have to tell you that photos or art that size isn't very easy to come by.  But I really liked the colors that were already there (yes, the Pier One label actually inspired me).

I purchased some kraft paper and played around with some fonts.  Here's what I came up with.  A letter for me, a letter for my hubby.  I put them in a light gray outline/box to remove the guess-work out of cutting.

Look what some scissors do, girls and boys:


Less than five minutes later (dog-petting time is included in the time count).

I'll photograph them in the bedroom soon.  A current bedroom photograph is always on the weekend to-do list.

Any other frame-filling ideas for a unique size area?  DIY art experiences of your own?  Oh--and leave a comment below if you'd like the name of the font I used or something.

Monday, April 25, 2011

How to Add Padding under Slipcovers - Wing Chair Update!

This is kind of a how-to... but I'm hesitant to call it that because it's really just more of a "how I did it" post. 

You may remember how I mentioned the new (new to us, that is) wing chairs arrived in all their glory.  Prettiness all around!  But some of the texture from the underlying upholstery was showing through, and my lovely MIL mentioned some batting might do the trick if it was bothering me. 

Off to Hancock Fabrics...


I purchased some batting (Low Loft, Queen Size polyester batting).  Two bags. One for each chair.

Here's where you're in for some fun: For the first time in who-knows-how-long, I haven't even Googled this.  That's right.  Everything accomplished was due to some head-scratching and "why don't I just..." moments.  That means YOU  my dear readers, may just get to point and laugh.  Because, even as I'm writing this, I have no idea if there was a better way to have done it.  If you know any tips, please share them below.  I still have one chair to cover!

Ready for the how-to how-I-did-it post?

Umm-kay, so...  You get your batting and figure out how to wrap a portion of your piece with it.  For me, it was the bottom portion.


Then you trim around it.


And it looks like this:


Next, I wrapped the arms of the chair.


Then the back, gathering the extra fabric and holding it place with a "chip clip" on the back.


Then I hand-stitched the batting on the arms to the batting on the back.


On the back, where the batting shouldn't move at all and people won't be sitting, I just stapled the batting together (not to the chair, of course).


With this chair, there were quite a few "seams" I needed to stitch to get a really snug fit, but there's the simple explanation.  And here's the difference.


Before...  You can see the texture of the fabric underneath the slipcovers.

Before adding batting
After adding the batting:

No bumps!
Before

After 


Here are some full-length shots:


The back even looks smoother. By the way, this is one of my favorite angles of any wing back chair.  If I angle it towards the corner I would.  (Cue:  "In my own little corner, in my own little chair, I can be whatever I want to be..."). 


One down. One to go. 

Any tips for the next chair?  Are ya' pointing and laughing because I should have at least consulted the internet-machine before plunging into this one?  Do you have experience with batting, or adding padding underneath slipcovers?