

You may have read that we've been in serious need of a new light fixture in the bathroom.
We wanted something that coordinated with our chrome fixtures, added some glamor in our little-bitty bathroom, and had the depth of an authentically aged piece. I purchased this steal for a mere 25 buckaroos (and it was listed on other sites for around $300... happy dance!).

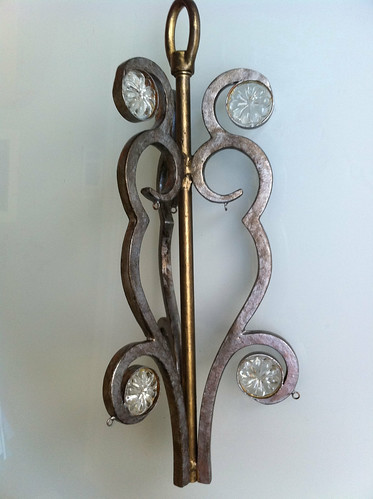
The crystals were beautiful and the metal was heavy and sturdy, but the finish was very different than the photo online. Instead, it was a copper-y red finish... not bad, but it would that wouldn’t work in the bathroom.
So I decided to paint this sucker. Fortunately, my darling mother-in-law has done this kind of thing more than once, so she held my hand at every step. (And the bonus? It was fun!)
Supplies:
- Chandelier, or something to paint (umm, duh)
- Bronze paint (I used spray paint and painted by hand, but acrylic paint will work)
- Satin nickel / silver paint (Again, I used spray paint, but other paint would work)
- Gold paint (I used a “Gold Metallic Surfacer” that came in a 3-pack with other paints)
- Dark bronze paint (I used a “Blackened Bronze Metallic Surfacer”, part of said 3-pack)
- Various paint brushes
- Paper towels
- Plastic dishes (to hold your paint)
 |
| Supplies to paint a chandelier |
Prep
If your chandelier is already assembled, remove the crystals. Use painter’s tape on any glass areas you can’t remove.
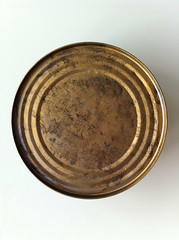
 |
| Prepping the chandelier for painting. By the way, see how red the color is? |
Step 0 (meaning not always necessary): Paint dark bronze.
If your chandelier is a really light color, laying a dark base will help to create create a layered, aged look, but in all honesty we probably could have skipped this step since our copper chandelier was dark enough already.
My sweet hubby was running errands while I was chained to a desk at work, so I asked him to pick up some supplies. Since hubs couldn’t find any bronze acrylic paint (and was dying to leave the craft store) he picked up the oil-based spray paint. I sprayed it into a dish, and applied with a small paint brush. But if you can find acrylic paint, I say use it. It’s easier to clean up after all.
Another note: It wouldn’t hurt to use a darker color (oil-rubbed bronze) than I did (bronze).
Step 1: Paint the chandelier your color of choice (gold and silver, in this case)
We decided to paint this chandelier in both gold and silver with a small brush.
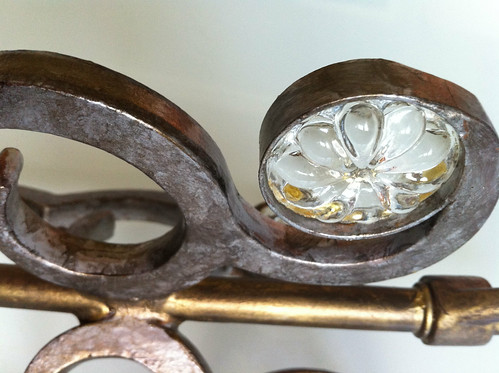
Here it is after painting the satin nickel. Notice how some of the bronze paint is showing through just a bit? That's just fine.
 |
| After painting with silver nickel (by hand) |
And after the gold:

Step 2: Use blackened bronze paint to create antique finish.
This step is where the magic happens. And remember (advice from my reassuring MIL) if it doesn’t turn out perfectly, you can just paint on top of your mess-up with gold or silver and start over again. No big deal! :) So try not to be nervous.
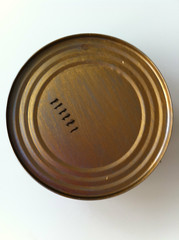
We tested a few techniques on the top of a soup can first. Here’s the technique that worked best for us (also demonstrated on the top of a can):
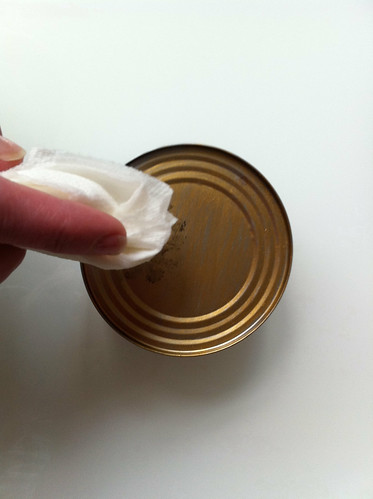
2.1 Paint stipples/dots of the blackened bronze paint. Use your brush to paint little dots in one area. Side note: our paint was actually called a "blackened bronze metallic surfacer". Also notice that that we weren’t using oil paint for the bronze paint since it wouldn’t play well with the water on the paper towel.

2.2 Blot the area with a damp paper towel.
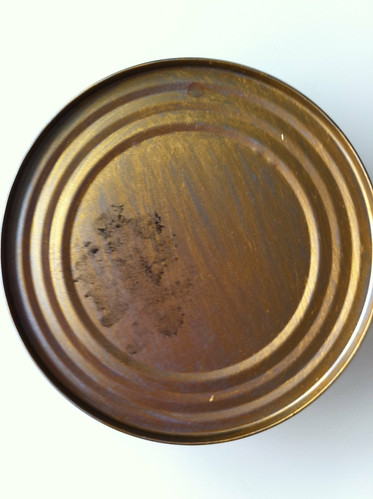
Keep working in sections
The bronze doesn’t have to be evenly distributed. In fact, it shouldn’t be. We actually went back and added some random darker spots, which really helped to achieve the aged look we’re after.
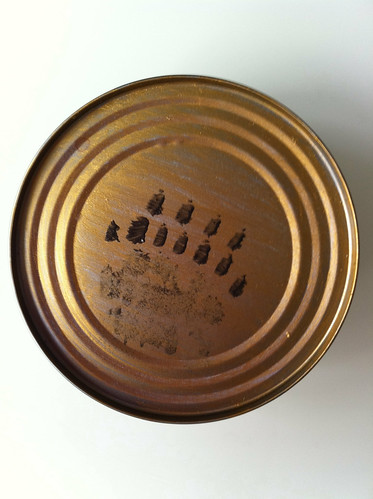
2.3 Use bronze fill any crevices and wipe off the surrounding area with a damp paper towel, leaving the gaps filled with dark paint. We added a little bit of water to ours for this step, but depending on the consistency of your paint water may not be necessary.
 |
| Use watered-down bronze paint on any crevices and wipe off with a damp paper towel (leaving the gaps filled with dark paint). |
"After" photos of the chandelier hung are coming soon! Thanks again to my MIL for everything.
Has anyone else tried painting a chandelier or creating an antique finish? What techniques did you find helpful?
You may also like:
It's Up! - Chandelier in the Bathroom

Looks outstanding...love the idea you had here.
ReplyDeleteBlessings,
Linda
Thank you, Linda!
ReplyDeletemay i ask where you purchased it? or the manufacturer/ model? :)
ReplyDeleteHi Jennifer,
ReplyDeleteI ordered it from CSN lighting. It's called the Thomasville Parisienne Chandelier. Let me know if you decide to get it! ;)
Erin
OMG This is BRILLIANT! I'm going to try this week!
ReplyDeleteWe are doing this to one for our wedding next weekend
ReplyDeleteAn outstanding share! I have just forwarded this onto a coworker who had been doing a little homework on this. And he in fact bought me breakfast simply because I stumbled upon it for him... lol. So let me reword this.... Thanks for the meal!! But yeah, thanx for spending some time to discuss this topic here on your website.
ReplyDeleteThen they would set up the auction room and sometimes charge admittance to the auction besides charging a buyer's premium on whatever is sold online auction catalog
ReplyDeleteHello .... friend
ReplyDeleteJual obat aborsi murah
Obat Aborsi Cytotec
Jual obat aborsi cytotec asli
Jual obat aborsi bandung
Jual obat aborsi batam
Jual obat aborsi makassar
Jual obat aborsi malang
This tutorial on creating an antique chandelier finish sounds like a fun and rewarding project.
ReplyDelete